Spam detection is one of the basic classification problems which have been solved very efficiently by applying machine learning concepts. As most projects limit themselves to the normal routine of machine learning,i.e. training models, making predictions, checking accuracy, and iterating these steps to achieve the right mix, I decided to take a step further and convert the output of this process into a basic standard tool which can be used by uninitiated user to identify spam/ham from their messages. It is part of the wide NLP application gamut, where you derive insights from textual information.
This project utilizes the SMS dataset taken from the SMS Spam Collection Dataset. For this project, I am starting with a Jupyter Notebook as it eases the data cleansing, model training & testing pipeline workload by not requiring you to re-run the entire script every time. Once we have settled on a model configuration, we can create separate scripts for deploying it in Flask.
Importing the basic necessities
import pandas as pd
import numpy as np
import matplotlib.pyplot as plt
import seaborn as sns

%matplotlib inline
sns.set_style("whitegrid")
Reading the dataset
sms = pd.read_csv("spam.csv",encoding='latin-1')
sms.columns = ['label', 'message']

sms.head()
| label | message | |
|---|---|---|
| 0 | ham | Go until jurong point, crazy.. Available only ... |
| 1 | ham | Ok lar... Joking wif u oni... |
| 2 | spam | Free entry in 2 a wkly comp to win FA Cup fina... |
| 3 | ham | U dun say so early hor... U c already then say... |
| 4 | ham | Nah I don't think he goes to usf, he lives aro... |
Exploratory Data Analysis
Let’s explore the dataset to gather an understanding of what makes a message spam or ham
sms.describe()
| label | message | |
|---|---|---|
| count | 5572 | 5572 |
| unique | 2 | 5169 |
| top | ham | Sorry, I'll call later |
| freq | 4825 | 30 |
sms['label'].value_counts()
ham     4825
spam     747
Name: label, dtype: int64
So we have 4825 ham and 747 spam messages
sms['label_num'] = sms['label'].map({'ham': 0, 'spam': 1})
sms.head()
| label | message | label_num | |
|---|---|---|---|
| 0 | ham | Go until jurong point, crazy.. Available only ... | 0 |
| 1 | ham | Ok lar... Joking wif u oni... | 0 |
| 2 | spam | Free entry in 2 a wkly comp to win FA Cup fina... | 1 |
| 3 | ham | U dun say so early hor... U c already then say... | 0 |
| 4 | ham | Nah I don't think he goes to usf, he lives aro... | 0 |
Let’s add a basic feature ‘message length’ to our dataset. You may find many advanced feature engineering techniques for spam classification problem but at the end it all boils down to your domain knowledge and expected accuracy of results. For now, we will add only this feature
sms['message_len'] = sms.message.apply(len)
sms.head()
| label | message | label_num | message_len | |
|---|---|---|---|---|
| 0 | ham | Go until jurong point, crazy.. Available only ... | 0 | 111 |
| 1 | ham | Ok lar... Joking wif u oni... | 0 | 29 |
| 2 | spam | Free entry in 2 a wkly comp to win FA Cup fina... | 1 | 155 |
| 3 | ham | U dun say so early hor... U c already then say... | 0 | 49 |
| 4 | ham | Nah I don't think he goes to usf, he lives aro... | 0 | 61 |
plt.figure(figsize=(12, 8))

sms[sms.label=='ham'].message_len.plot(bins=35, kind='hist', color='blue',
                                       label='Ham messages', alpha=0.6)
sms[sms.label=='spam'].message_len.plot(kind='hist', color='red',
                                       label='Spam messages', alpha=0.6)
plt.legend()
plt.xlabel("Message Length")

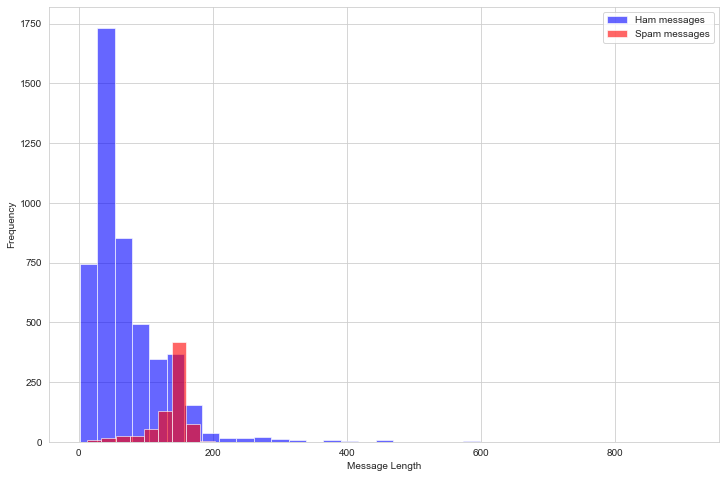
It appears that spam messages are usually longer than ham messages. Let’s check out each category separately to get a numeric view on this
sms[sms.label=='ham'].describe()
| label_num | message_len | |
|---|---|---|
| count | 4825.0 | 4825.000000 |
| mean | 0.0 | 71.023627 |
| std | 0.0 | 58.016023 |
| min | 0.0 | 2.000000 |
| 25% | 0.0 | 33.000000 |
| 50% | 0.0 | 52.000000 |
| 75% | 0.0 | 92.000000 |
| max | 0.0 | 910.000000 |
sms[sms.label=='spam'].describe()
| label_num | message_len | |
|---|---|---|
| count | 747.0 | 747.000000 |
| mean | 1.0 | 138.866131 |
| std | 0.0 | 29.183082 |
| min | 1.0 | 13.000000 |
| 25% | 1.0 | 132.500000 |
| 50% | 1.0 | 149.000000 |
| 75% | 1.0 | 157.000000 |
| max | 1.0 | 224.000000 |
As we can see above, 75% of the ham messages have length less than 92 characters whereas 75% of the spam messages have length more than 132 characters. So basically, if you just judge a message by its length, you would be right 75% of the time. Pretty Interesting, isn’t it?
Text Pre-Processing
Before we get into any kind of machine learning classification models, let’s clean our messages of punctuation and stopwords. The former is pretty obvious to everyone, but for those who are not familiar with the latter one, /stopwords/ are commonly occuring words found in any launguage text which help form continuity and structure but attribute no particular or unique meaning to the sentence, for e.g. “The”,”is”,”at”, etc. Python’s nltk library has a list of stopwords that we can use to filter out these.
import string
from nltk.corpus import stopwords

def text_process(message):
    """
    Takes in a string of text and remove punctuation & stopwords
    Return type: string
    Returns: String of cleaned message
    """
    STOPWORDS = stopwords.words('english') + ['u', 'ü', 'ur', '4', '2', 'im', 'dont', 'doin', 'ure']
    # Check characters to see if they are in punctuation
    nopunc = [char for char in message if char not in string.punctuation]

    # Join the characters again to form the string.
    nopunc = ''.join(nopunc)

    # Now just remove any stopwords
    return ' '.join([word for word in nopunc.split() if word.lower() not in STOPWORDS])
Let’s apply the above function and create a new field having clean messages
sms['clean_message'] = sms['message'].apply(text_process)
sms.head()
| label | message | label_num | message_len | clean_message | |
|---|---|---|---|---|---|
| 0 | ham | Go until jurong point, crazy.. Available only ... | 0 | 111 | Go jurong point crazy Available bugis n great ... |
| 1 | ham | Ok lar... Joking wif u oni... | 0 | 29 | Ok lar Joking wif oni |
| 2 | spam | Free entry in 2 a wkly comp to win FA Cup fina... | 1 | 155 | Free entry wkly comp win FA Cup final tkts 21s... |
| 3 | ham | U dun say so early hor... U c already then say... | 0 | 49 | dun say early hor c already say |
| 4 | ham | Nah I don't think he goes to usf, he lives aro... | 0 | 61 | Nah think goes usf lives around though |
Let’s take a look at what are the most commonly occuring words in each category of messages
from collections import Counter

# Splitting sentences into tokens
ham_tokenized = sms[sms.label=='ham']['clean_message'].apply(lambda x: [word.lower() for word in x.split()])
spam_tokenized = sms[sms.label=='spam']['clean_message'].apply(lambda x: [word.lower() for word in x.split()])

# Creating counter objects for keeping track of token frequency
ham_words = Counter()
spam_words = Counter()

# Iterating and updating counter for all messages in the category
for msg in ham_tokenized:
    ham_words.update(msg)
for msg in spam_tokenized:
    spam_words.update(msg)

print("Top 10 words in ham messages are:\n",ham_words.most_common(10))
print("\nTop 10 words in spam messages are:\n",spam_words.most_common(10))
Top 10 words in ham messages are:
 [('get', 303), ('ltgt', 276), ('ok', 272), ('go', 247), ('ill', 236), ('know', 232), ('got', 231), ('like', 229), ('call', 229), ('come', 224)]

Top 10 words in spam messages are:
 [('call', 347), ('free', 216), ('txt', 150), ('mobile', 123), ('text', 120), ('claim', 113), ('stop', 113), ('reply', 101), ('prize', 92), ('get', 83)]
If we observe the above results, we can see that there are different forms of the same root word getting repeated, such as “get”-“got”,”come”-“go”. As these hold similar significance in a message from a spam/ham classification perspective, let’s just reduce every word to its root word (aka stem) using the Porter Stemmer. If you need more background on the difference between lemmatization and stemming, when to use which, and how to implement it, feel free to browse this link from Datacamp
Let’s redefine out text_process function incorporating Stemming in there. This time we will also use nltk’s tokenize function to convert strings into tokens instead of our normal split methodology
from nltk.tokenize import word_tokenize
from nltk.stem import PorterStemmer

def text_process_stem(message):
    """
    Takes in a string of text and performs the following steps:
    1. Remove punctuation
    2. Tokenize
    3. Remove stopwords
    4. Stems words to their root forms
    Return type: string
    Returns: String of cleaned & stemmed message
    """
    STOPWORDS = stopwords.words('english') + ['u', 'ü', 'ur', '4', '2', 'im', 'dont', 'doin', 'ure']
    # Check characters to see if they are in punctuation
    nopunc = [char for char in message if char not in string.punctuation]

    # Join the characters again to form the string
    nopunc = ''.join(nopunc)

    # Instantiating a PorterStemmer object
    porter = PorterStemmer()
    token_words = word_tokenize(nopunc)
    stem_message=[]
    for word in token_words:
        stem_message.append(porter.stem(word))
        stem_message.append(" ")
    return ''.join(stem_message)
sms['clean_message_stem'] = sms['message'].apply(text_process)
sms.head()
| label | message | label_num | message_len | clean_message | clean_message_stem | |
|---|---|---|---|---|---|---|
| 0 | ham | Go until jurong point, crazy.. Available only ... | 0 | 111 | Go jurong point crazy Available bugis n great ... | Go jurong point crazy Available bugis n great ... |
| 1 | ham | Ok lar... Joking wif u oni... | 0 | 29 | Ok lar Joking wif oni | Ok lar Joking wif oni |
| 2 | spam | Free entry in 2 a wkly comp to win FA Cup fina... | 1 | 155 | Free entry wkly comp win FA Cup final tkts 21s... | Free entry wkly comp win FA Cup final tkts 21s... |
| 3 | ham | U dun say so early hor... U c already then say... | 0 | 49 | dun say early hor c already say | dun say early hor c already say |
| 4 | ham | Nah I don't think he goes to usf, he lives aro... | 0 | 61 | Nah think goes usf lives around though | Nah think goes usf lives around though |
Model Build & Testing
The classification alogrithms we would be using for our problem usually work with numerical feature vector. For that reason, we will need to convert our messages into numerical features. There are multiple methods to convert a corpus of text into a numerical vector, simplest of which is bag-of-words approach, where each sentence is expressed using a bag of words that we call vocabulary and every word occurs a number of times in that sentence. For performing this conversion, we will use the CountVectorizer available in scikit-learn.
To perform this modelling, we will be subjecting our data to three sequential steps:
- Bag-of-Words creation: We will use the
CountVectorizerto create word-message matrix with each element representing the freuquency of occurence for that word-message combination. You can imagine it to look like the following table:
| Word/Message | Message 1 | Message 2 | … | Message N |
|---|---|---|---|---|
| Word 1 | 0 | 1 | … | 1 |
| Word 2 | 2 | 0 | … | 0 |
| Word 3 | 1 | 1 | … | 1 |
- Transforming using TF-IDF*: TF-IDF stands for “Term Frequency - Inverse Document Frequency”, what it does is it positively weighs every term for its occurence in a message and also negatively weighs that term for occuring frequently in general, which results into a normalized weight associated to every token. Taking from the official documentation
The goal of using tf-idf instead of the raw frequencies of occurrence of a token in a given document is to scale down the impact of tokens that occur very frequently in a given corpus and that are hence empirically less informative than features that occur in a small fraction of the training corpus
- Multinomial Naive Bayes Model: Using the normalized weightages for each word in the corpus as input, we then fit a Naive Bayes classifier model to this data. Naive Bayes works great in spam filtering use case because it assumes that every feature (token in our case) is independently related to the overall outcome. Quoting the official documentation:
The multinomial Naive Bayes classifier is suitable for classification with discrete features (e.g., word counts for text classification). The multinomial distribution normally requires integer feature counts. However, in practice, fractional counts such as tf-idf may also work.
Lastly, to evaluate the efficacy of our model we will be using the precision score. The reason for choosing precision is that it penalizes the model for false positives, i.e. in our case classifying a normal/important message as Spam and putting it in Junk. To get a good idea about the different evaluation metrics and when to use them, you can refer to this article
Let’s split the dataset into train and test sets, followed by creating a machine-learning pipeline comprising the above three steps
from sklearn.model_selection import train_test_split
from sklearn.feature_extraction.text import CountVectorizer
from sklearn.feature_extraction.text import TfidfTransformer
from sklearn.naive_bayes import MultinomialNB
from sklearn.pipeline import Pipeline
from sklearn import metrics

X = sms.clean_message
y = sms.label_num
X_train, X_test, y_train, y_test = train_test_split(X, y, random_state=1)
pipe = Pipeline([('bow', CountVectorizer()),
                 ('tfid', TfidfTransformer()),
                 ('model', MultinomialNB())])
pipe.fit(X_train, y_train)
Pipeline(memory=None,
     steps=[('bow', CountVectorizer(analyzer='word', binary=False, decode_error='strict',
        dtype=<class 'numpy.int64'>, encoding='utf-8', input='content',
        lowercase=True, max_df=1.0, max_features=None, min_df=1,
        ngram_range=(1, 1), preprocessor=None, stop_words=None,
        strip_...ear_tf=False, use_idf=True)), ('model', MultinomialNB(alpha=1.0, class_prior=None, fit_prior=True))])
y_pred = pipe.predict(X_test)

# Evaluating model
print("Accuracy is: {:2f}".format(metrics.accuracy_score(y_test,y_pred)))
print("Precision is: {:2f}".format(metrics.precision_score(y_test,y_pred)))
print("ROC-AUC is: {:2f}".format(metrics.roc_auc_score(y_test,y_pred)))
Accuracy is: 0.966978
Precision is: 1.000000
ROC-AUC is: 0.872222
That’s a good precision but not so good AUC score. Let’s try comparing this with logistic regression model
from sklearn.linear_model import LogisticRegression

pipe_log = Pipeline([('bow', CountVectorizer()),
                 ('tfid', TfidfTransformer()),
                 ('logmodel', LogisticRegression(solver='liblinear'))])

pipe_log.fit(X_train, y_train)

y_pred = pipe_log.predict(X_test)

# Evaluating model
print("Accuracy is: {:2f}".format(metrics.accuracy_score(y_test,y_pred)))
print("Precision is: {:2f}".format(metrics.precision_score(y_test,y_pred)))
print("ROC-AUC is: {:2f}".format(metrics.roc_auc_score(y_test,y_pred)))
Accuracy is: 0.963388
Precision is: 0.977778
ROC-AUC is: 0.865430
As we see, logistic regression is coming out to be a better model here rather than Naive-Bayes. We could further tune the count vectorizer we are using or the stemming/lemmatization techniques to increase the efficacy of this model. But for now, let’s just use this model and build a web app based on it
Let’s deploy it in Flask now!!
Creating Flask App
If you do not have it installed, you will first need to install flask, which you can easily do using pip install flask. To get familiar with Flask, and to get started with it, please refer to the official documentation which preps you quite well to take a stab at it.
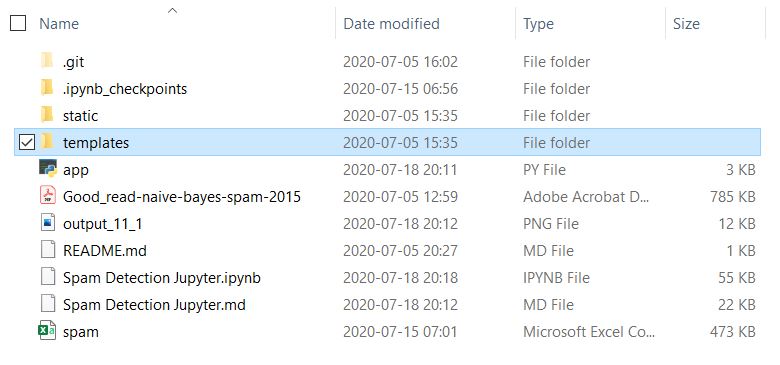
Flask requires you to have a basic folder structure setup in your project folder, similar to this screenshot here.
The essential thing to note is having a folder titled static which holds the css styling file and any kind of static content to be used on your web-app like photos, videos, etc.
Another folder that you need to have is templates which would house the html templates for rendering the different pages on your web-app.
To start with, let’s create a python script file ‘app.py’ in the project folder containing the following building blocks for the flask app
from flask import Flask,render_template,url_for,request

app = Flask(__name__)

@app.route('/')
def home():
	return render_template('home.html')

app.run(debug=True)
A quick overview of what we just did in there:
- Importing required libraries: a. Flask - Pretty obvious what it does b. render_template - Renders the HTML pages c. url_for - Generates url to a given endpoint with the method provided d. request - Enables HTML request methods
- Instantiating a flask app object using
app = Flask(__name__) - Create a function for rendering a page
a. Each function definition is preceeded by
@app.route('<fill_page_route>')where home page has the route “/” and then other pages have page addresses as “/page1” b. The home page function is defined with name ‘home’ c. After putting in the required server-side function for a page in the page function, it is must to userender_templateto render the page at the end - Lastly, we run the app passing turning on the debugging mode
For this basic app, we have created just two pages, where one allows you to enter your custom message and the other one shows you the predicted result. Let’s take a brief look at how the HTML templates for these two pages are structured.
Home Page
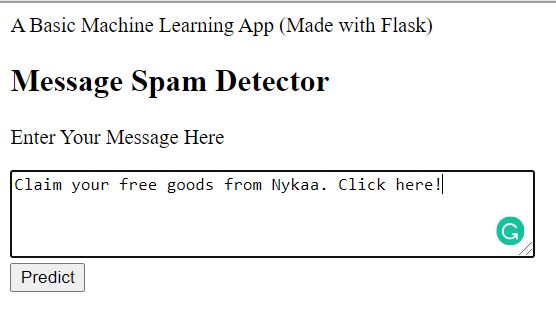
This is how the home page looks when you run the app
If you are familiar with HTML, you must have guessed that the major components here are:
- /Input Form/ - Allowing user to enter custom message
- /Submit buttom/ - Creating a request for Flask app to navigate to the next page and render the prediction results
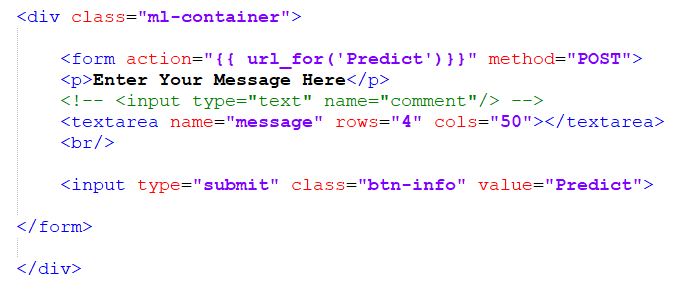
This is what the code for these components in the file home.html looks like:
In the form action above, we use the url_for decorator to generate a POST request url for “Predict”, which is then captured by the app.route we defined in Flask server to perform the next step
Results Page
This is how the results page looks when you push the ‘predict’ button
For this page, we need a binary classification output (0/1) coming from the server-side created by predicting custom message class using the already trained model. To do this, we first copy the code required for reading in the training data and fitting our model from our Jupyter notebook into the script app.py. This is how the script looks after pasting
from flask import Flask,render_template,url_for,request
import pandas as pd
import string
from nltk.corpus import stopwords
from nltk.tokenize import word_tokenize
from nltk.stem import PorterStemmer
from sklearn.model_selection import train_test_split
from sklearn.feature_extraction.text import CountVectorizer
from sklearn.feature_extraction.text import TfidfTransformer
from sklearn.naive_bayes import MultinomialNB
from sklearn.linear_model import LogisticRegression
from sklearn.pipeline import Pipeline


app = Flask(__name__)

# Adding in code from the Jupyter for training the model
sms = pd.read_csv("spam.csv", encoding="latin-1")
sms.columns = ['label', 'message']
# Features and Labels
sms['label_num'] = sms['label'].map({'ham': 0, 'spam': 1})

def text_process(message):
	"""
	Takes in a string of text and performs the following steps:
	1. Remove punctuation
	2. Tokenize
	3. Remove stopwords
	4. Stems words to their root forms
	Return type: string
	Returns: String of cleaned & stemmed message
	"""
	STOPWORDS = stopwords.words('english') + ['u', 'ü', 'ur', '4', '2', 'im', 'dont', 'doin', 'ure']
	# Check characters to see if they are in punctuation
	nopunc = [char for char in message if char not in string.punctuation]

	# Join the characters again to form the string
	nopunc = ''.join(nopunc)

	# Instantiating a PorterStemmer object
	porter = PorterStemmer()
	token_words = word_tokenize(nopunc)
	stem_message=[]
	for word in token_words:
		stem_message.append(porter.stem(word))
		stem_message.append(" ")
	return ''.join(stem_message)

sms['clean_message'] = sms['message'].apply(text_process)

X = sms.clean_message
y = sms.label_num

pipe = Pipeline([('bow', CountVectorizer()),
				 ('tfid', TfidfTransformer()),
				 ('model', LogisticRegression(solver='liblinear'))])

pipe.fit(X, y)


@app.route('/')
def home():
	return render_template('home.html')

@app.route('/Predict',methods=['POST'])
def Predict():

	if request.method == 'POST':
		message = request.form['message']
		data = [message]
		my_prediction = pipe.predict(data)
	return render_template('result.html',prediction = my_prediction)

app.run(debug=True)
In addition to pasting the model code from Jupyter, we have also added an app.route('/Predict',methods=['POST']) which captures POST request generated on pressing the ‘Predict’ button on home page. Followed by that, we define the function for “Predict”, which basically just reads in the custom message entered by user, runs the predict function on it and returns our rendered HTML page result.html. If you observe, this time we have also passed a parameter prediction to the render_template function. This parameter contains the binary classification result (0/1) for the custom message. Our HTML script result.html will take this as input and apply a logic to display the right result.
Let’s take a look at the logic in result.html file
This is how we use if-else in HTML to render two different results.


